User Management
This guide covers creating users, managing groups, and assigning permissions in the Serverless CMS.
User Roles and Groups
The CMS uses a group-based permission system with two types of groups:
System Groups
Platform-level groups with fixed permissions:
Group | Permissions |
|---|---|
admin | Full platform access, can manage all sites and users |
site-creator | Can create new sites and manage owned sites |
site-editor | Can edit site settings (display name, SEO, theme) |
authentication-admin | Can manage users and groups |
Site Groups
Site-scoped groups auto-created for each site:
Group | Permissions |
|---|---|
{siteName}-admin | Full site management (templates, pages, settings, publishing) |
{siteName}-author | Create and edit pages |
{siteName}-templates | Manage templates |
{siteName}-publish | Publish and unpublish pages |
Example: For a site with subdomain blog, the groups are:
- blog-admin
- blog-author
- blog-templates
- blog-publish
Custom Groups
Administrators can create custom groups with specific permissions for specialized workflows.
Creating Users
To create a new user:
- Navigate to Users from the main navigation
- Click Create User
- Fill in the user details:
- Email: User's email address (used for login)
- Temporary Password: Initial password (user must change on first login)
- Groups: Select groups to assign
- Click Create
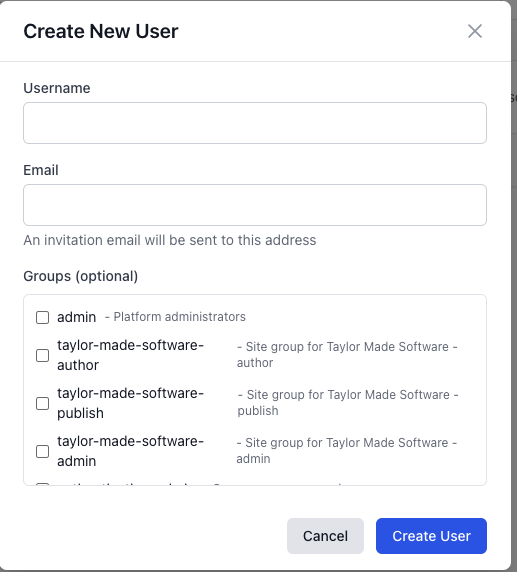
What Happens When You Create a User
The system:
- Creates the user account in AWS Cognito
- Sends an invitation email with login instructions
- Assigns the user to selected groups
- Requires password change on first login
User Creation Requirements
- Email must be unique across all users
- Temporary password must meet password policy requirements:
- Minimum 12 characters
- At least one uppercase letter
- At least one number
- At least one symbol
Managing User Groups
Viewing User Groups
To view a user's group memberships:
- Navigate to Users
- Click on a user
- View the Groups section
Adding Users to Groups
To add a user to a group:
- Navigate to Groups
- Select the group
- Click Add Members
- Select users to add
- Click Add
Removing Users from Groups
To remove a user from a group:
- Navigate to Groups
- Select the group
- Click the × next to the user you want to remove
- Confirm the removal
Managing Site Access
Assigning Site Permissions
To give a user access to a site:
- Navigate to Sites → Select the site → Groups
- Select the appropriate site group (admin, author, templates, or publish)
- Click Add Members
- Select the user
- Click Add
Removing Site Access
To revoke a user's access to a site:
- Navigate to Sites → Select the site → Groups
- Select the site group
- Click the × next to the user
- Confirm the removal
Site Access Best Practices
- Principle of least privilege: Grant only the permissions users need
- Use site groups: Assign users to site groups rather than system groups when possible
- Regular audits: Review user access quarterly
- Remove access promptly: Revoke access when users leave the team
Deactivating Users
To deactivate a user:
- Navigate to Users
- Click the ⋮ menu next to the user
- Select Deactivate
- Confirm the action
Deactivated users:
- Cannot log in
- Retain their group memberships (restored if reactivated)
- Remain in the user list (marked as "Inactive")
Reactivating Users
To reactivate a deactivated user:
- Navigate to Users
- Filter by Inactive users
- Click the ⋮ menu next to the user
- Select Reactivate
- Confirm the action
Password Resets
Admin-Initiated Password Reset
To reset a user's password:
- Navigate to Users
- Click the ⋮ menu next to the user
- Select Reset Password
- Enter a new temporary password
- Click Reset
The user will receive an email with instructions and must change the password on next login.
User-Initiated Password Reset
Users can reset their own passwords:
- On the login screen, click Forgot Password?
- Enter email address
- Check email for reset code
- Enter reset code and new password
- Log in with new password
Custom Groups
Administrators can create custom groups for specialized workflows.
Creating a Custom Group
- Navigate to Groups
- Click Create Custom Group
- Fill in the group details:
- Name: Descriptive group name
- Description: Purpose of the group
- Permissions: Select permissions to grant
- Click Create
Editing Custom Groups
To edit a custom group:
- Navigate to Groups
- Click the custom group
- Click Edit
- Update the name, description, or permissions
- Click Save
Deleting Custom Groups
To delete a custom group:
- Navigate to Groups
- Click the ⋮ menu next to the custom group
- Select Delete
- Confirm the deletion
Note: You cannot delete system groups or site groups. Site groups are automatically deleted when their site is deleted.
Permission Reference
System Group Permissions
Permission | admin | site-creator | site-editor | authentication-admin |
|---|---|---|---|---|
Create sites | ✓ | ✓ | ||
Delete sites | ✓ | ✓ (owned) | ||
Edit site settings | ✓ | ✓ (owned) | ✓ (assigned) | |
Manage users | ✓ | ✓ | ||
Manage groups | ✓ | ✓ | ||
View all sites | ✓ |
Site Group Permissions
Permission | admin | author | templates | publish |
|---|---|---|---|---|
Create pages | ✓ | ✓ | ||
Edit pages | ✓ | ✓ | ||
Delete pages | ✓ | |||
Publish pages | ✓ | ✓ | ||
Unpublish pages | ✓ | ✓ | ||
Create templates | ✓ | ✓ | ||
Edit templates | ✓ | ✓ | ||
Delete templates | ✓ | ✓ | ||
Edit site settings | ✓ | |||
Manage site groups | ✓ |
Best Practices
User Management
- Use email aliases: For shared accounts, use email aliases (e.g., cms-admin@company.com)
- Document permissions: Keep a record of who has access to what
- Regular reviews: Audit user access quarterly
- Offboarding process: Deactivate users immediately when they leave
Group Management
- Descriptive names: Use clear, descriptive names for custom groups
- Document purpose: Add descriptions explaining when to use each group
- Avoid over-permissioning: Grant only necessary permissions
- Use site groups: Prefer site groups over system groups for site-specific access
Security
- Strong passwords: Enforce password policy requirements
- MFA recommended: Enable multi-factor authentication for admin users
- Monitor activity: Review user activity logs regularly
- Limit admin access: Minimize the number of users with admin permissions
Troubleshooting
User Can't Log In
If a user reports login issues:
- Check account status: Verify the user is not deactivated
- Verify email: Confirm the email address is correct
- Reset password: Initiate an admin password reset
- Check MFA: Ensure MFA is configured correctly (if enabled)
User Can't Access a Site
If a user can't access a site:
- Check site groups: Verify the user is in the appropriate site group
- Check system groups: Confirm the user has necessary system permissions
- Refresh session: Have the user log out and log back in
- Review permissions: Ensure the group has the required permissions
Can't Delete Last Admin
The system prevents deleting or deactivating the last admin user. To change the admin:
- Create a new admin user
- Verify the new admin can log in
- Remove admin permissions from the old user
Related Topics
- Creating Sites — Site groups are created automatically
- Security — Security requirements and best practices