SEO Settings
Search Engine Optimization (SEO) settings help your pages rank better in search results and appear correctly when shared on social media. This guide covers page-level and site-level SEO configuration.
Page-Level SEO
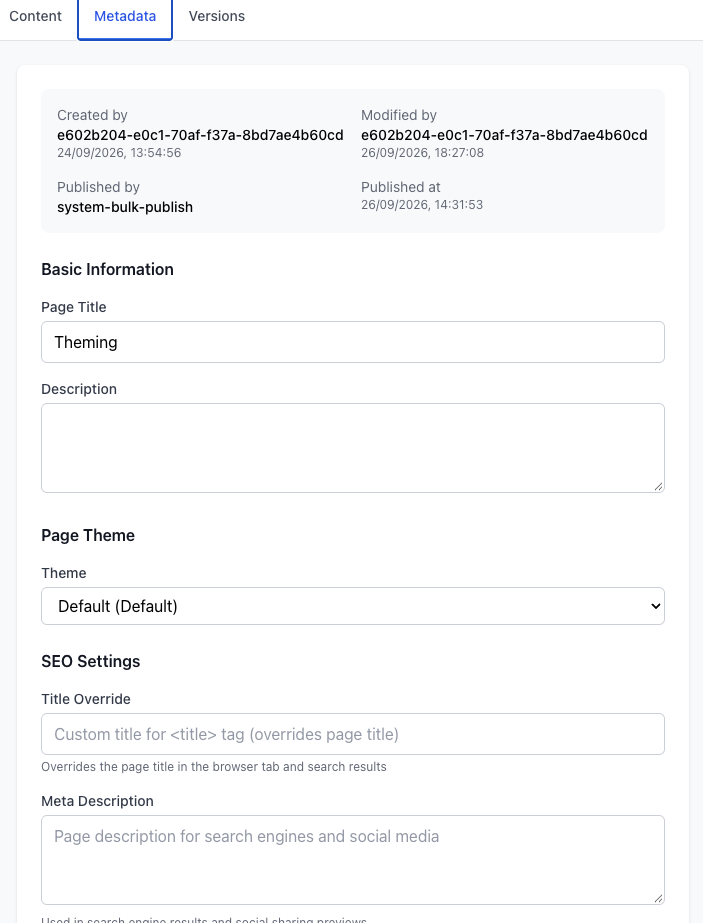
Basic Metadata
Every page has basic SEO metadata:
- Title: Appears in search results and browser tabs (set in page settings)
- Description: Appears in search result snippets (set in page settings)
- Slug: The URL path for the page
Accessing SEO Settings
To configure advanced SEO settings for a page:
- Navigate to the page editor
- Click Settings → SEO
- Configure the SEO options
- Click Save
Open Graph Tags
Open Graph tags control how your page appears when shared on social media (Facebook, LinkedIn, etc.).
Available Settings
Setting | Description | Default |
|---|---|---|
OG Image | Image shown in social shares | First image on page |
OG Type | Content type | website |
OG Title | Title in social shares | Page title |
OG Description | Description in social shares | Page description |
OG Type Options
- website: General web pages
- article: News articles, blog posts
- blog: Blog-specific content
Best Practices
- Image size: Use images at least 1200×630 pixels
- Image format: Use JPG or PNG
- Image content: Ensure images are relevant and high-quality
- Test shares: Use Facebook's Sharing Debugger to preview
Twitter Card Tags
Twitter Card tags control how your page appears when shared on Twitter/X.
Available Settings
Setting | Description | Default |
|---|---|---|
Twitter Card | Card type | summary |
Twitter Title | Title in tweets | Page title |
Twitter Description | Description in tweets | Page description |
Twitter Image | Image shown in tweets | OG Image or first image |
Twitter Card Types
- summary: Small image card (default)
- summary_large_image: Large image card (recommended for visual content)
Best Practices
- Use large images: summary_large_image gets more engagement
- Image size: Use images at least 800×418 pixels for large cards
- Test cards: Use Twitter's Card Validator to preview
Canonical URLs
Canonical URLs tell search engines which version of a page is the "official" one. This prevents duplicate content issues.
When to Use Canonical URLs
- Multiple URLs for same content: If the same content is accessible via different URLs
- Syndicated content: If you republish content from another site
- Parameter variations: If URLs have query parameters that don't change content
Setting a Canonical URL
- Navigate to SEO settings for the page
- Enter the canonical URL in the Canonical URL field
- Click Save
Example: If your page is accessible at both /blog/post and /blog/post?ref=twitter, set the canonical URL to https://yourdomain.com/blog/post.
Robots Meta Directives
Robots meta directives control how search engines index and display your page.
Available Directives
Directive | Effect |
|---|---|
noindex | Don't include this page in search results |
nofollow | Don't follow links on this page |
noarchive | Don't show a cached version of this page |
nosnippet | Don't show a snippet in search results |
When to Use Directives
- noindex: For private pages, thank-you pages, or duplicate content
- nofollow: For pages with untrusted user-generated links
- noarchive: For time-sensitive content that shouldn't be cached
- nosnippet: For pages where you don't want search engines showing excerpts
Setting Robots Directives
- Navigate to SEO settings for the page
- Select the directives you want to apply
- Click Save
Note: Multiple directives can be combined (e.g., noindex, nofollow).
JSON-LD Structured Data
JSON-LD (JavaScript Object Notation for Linked Data) provides structured data to search engines, enabling rich results like article cards, breadcrumbs, and knowledge panels.
Automatic JSON-LD
The CMS automatically generates JSON-LD for:
- WebPage schema: Basic page metadata (title, description, URL)
- Organization schema: Site-level organization data (if configured)
- BreadcrumbList schema: Breadcrumb navigation (for pages with parent pages)
Custom JSON-LD
You can add custom JSON-LD for specialized content types:
- Navigate to SEO settings for the page
- Click Add JSON-LD
- Select a schema type or enter custom JSON
- Fill in the required fields
- Click Save
Common Schema Types
Article
For news articles and blog posts:
{
"@context": "https://schema.org",
"@type": "Article",
"headline": "Your Article Title",
"author": {
"@type": "Person",
"name": "Author Name"
},
"datePublished": "2024-01-15",
"image": "https://example.com/image.jpg"
}
BlogPosting
For blog posts:
{
"@context": "https://schema.org",
"@type": "BlogPosting",
"headline": "Your Blog Post Title",
"author": {
"@type": "Person",
"name": "Author Name"
},
"datePublished": "2024-01-15"
}
Product
For product pages:
{
"@context": "https://schema.org",
"@type": "Product",
"name": "Product Name",
"description": "Product description",
"offers": {
"@type": "Offer",
"price": "99.99",
"priceCurrency": "USD"
}
}
Validating JSON-LD
Use Google's Rich Results Test to validate your JSON-LD: https://search.google.com/test/rich-results
Site-Level SEO
Robots.txt
The robots.txt file tells search engines which pages to crawl.
Accessing Robots.txt Settings
- Navigate to Sites → Select your site
- Click Settings → SEO
- Edit the Robots.txt content
- Click Save
Default Robots.txt
User-agent: *
Allow: /
Sitemap: https://yourdomain.com/sitemap.xml
Custom Robots.txt
You can customize the robots.txt to:
- Block specific paths: Disallow: /admin/
- Block specific bots: User-agent: BadBot followed by Disallow: /
- Set crawl delay: Crawl-delay: 10
Example:
User-agent: *
Allow: /
Disallow: /private/
Disallow: /temp/
User-agent: GPTBot
Disallow: /
Sitemap: https://yourdomain.com/sitemap.xml
Sitemap.xml
The sitemap lists all published pages on your site, helping search engines discover content.
Automatic Sitemap Generation
The CMS automatically generates and updates sitemap.xml:
- On publish: Adds the page to the sitemap
- On unpublish: Removes the page from the sitemap
- On site rebuild: Regenerates the entire sitemap
Sitemap Format
<?xml version="1.0" encoding="UTF-8"?>
<urlset xmlns="http://www.sitemaps.org/schemas/sitemap/0.9">
<url>
<loc>https://yourdomain.com/</loc>
<lastmod>2024-01-15</lastmod>
<changefreq>weekly</changefreq>
<priority>1.0</priority>
</url>
<url>
<loc>https://yourdomain.com/about</loc>
<lastmod>2024-01-14</lastmod>
<changefreq>monthly</changefreq>
<priority>0.8</priority>
</url>
</urlset>
Submitting Sitemap to Search Engines
After publishing your site:
- Google Search Console: Add your site and submit the sitemap URL
- Bing Webmaster Tools: Add your site and submit the sitemap URL
Sitemap URL: https://yourdomain.com/sitemap.xml
Organization JSON-LD
Configure site-level organization data:
- Navigate to Sites → Select your site → Settings → SEO
- Click Configure Organization
- Fill in the organization details:
- Name: Organization name
- URL: Organization website
- Logo: Organization logo URL
- Social Profiles: Links to social media profiles
- Click Save
This data appears on all pages and helps search engines understand your organization.
SEO Best Practices
Content
- Unique titles: Each page should have a unique, descriptive title
- Compelling descriptions: Write descriptions that encourage clicks
- Keyword placement: Include target keywords naturally in titles and descriptions
- Content quality: Focus on high-quality, original content
Technical
- Mobile-friendly: Ensure pages work well on mobile devices
- Fast loading: Optimize images and minimize page weight
- HTTPS: Use HTTPS for all pages (handled automatically by the CMS)
- Clean URLs: Use descriptive, readable slugs
Metadata
- Title length: Keep titles under 60 characters
- Description length: Keep descriptions under 160 characters
- Image optimization: Use appropriately sized images with descriptive alt text
- Structured data: Add JSON-LD for rich results
Social Sharing
- OG images: Always set Open Graph images for better social shares
- Test shares: Preview how pages appear when shared
- Consistent branding: Use consistent images and messaging
Monitoring SEO Performance
Google Search Console
Monitor your site's search performance:
- Add your site to Google Search Console
- Submit your sitemap
- Monitor:
- Search queries driving traffic
- Pages with the most impressions
- Click-through rates
- Index coverage issues
Analytics
Track page performance:
- Page views
- Bounce rate
- Time on page
- Conversion rates
See AI Crawler Analytics for AI-specific analytics.
Header scripts (analytics, tag managers, verification)
The Site Settings screen has a Header scripts field. Anything you paste here is injected verbatim as the last thing inside the <head> of every published page (and the site's error page). Typical uses:
- Google Analytics / GA4 or Plausible snippets.
- Google Tag Manager loader (<script>…</script> + <noscript> fallback).
- Search Console / Bing / Ahrefs verification meta tags.
- Custom <link rel="preconnect"> or preload hints.
Notes:
- The content is emitted as-is — the CMS does not sanitise or escape it. Only paste snippets from sources you trust.
- Because the block sits after <title>, meta tags, JSON-LD and the page's inline <style> block, meta/link tags placed here override anything the CMS generated above.
Troubleshooting
Page Not Appearing in Search Results
If a page isn't appearing in search results:
- Check robots directives: Ensure noindex is not set
- Check robots.txt: Verify the page isn't blocked
- Submit sitemap: Submit your sitemap to search engines
- Wait: New pages can take days or weeks to appear
- Check Search Console: Look for indexing errors
Wrong Title/Description in Search Results
If search results show incorrect metadata:
- Update page metadata: Ensure title and description are correct
- Republish the page: Publish to update the live page
- Request re-indexing: Use Google Search Console to request re-indexing
- Wait: Search engines may take time to update
Social Shares Look Wrong
If social shares don't look right:
- Check OG tags: Verify Open Graph settings are correct
- Republish the page: Publish to update metadata
- Clear cache: Use Facebook Sharing Debugger or Twitter Card Validator to clear cache
- Test again: Share the page again to see updated preview
Related Topics
- Creating Pages — Set page titles and descriptions
- Publishing — Publish pages to update SEO metadata
- AI Crawler Analytics — Monitor AI crawler activity