Creating Pages
Pages are the content documents that make up your website. This guide covers creating, editing, and organizing pages.
Creating a New Page
- Navigate to Sites → Select your site → Pages
- Click Create Page
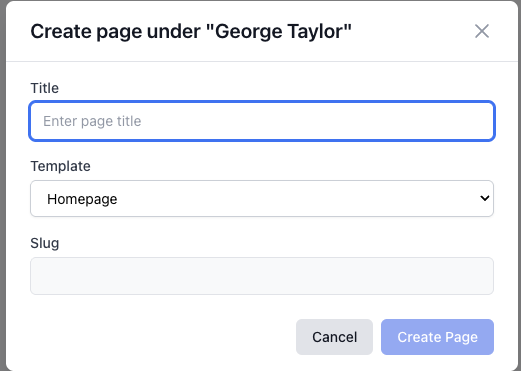
- Fill in the page details:
- Title: The page title (used in <title> tag and navigation)
- Description: Optional meta description for SEO
- Template: Select a template to define the page layout
- Parent Page: Optional parent page for hierarchical structure
- Slug: URL path for the page (auto-generated from title, but editable)
- Click Create
Page Editor
The page editor provides a visual interface for composing page content:
Content Zones
Content zones are defined by your selected template. Each zone allows you to:
- Add components: Drag components from the palette into the zone
- Reorder components: Drag components up or down within the zone
- Edit components: Click a component to open its property dialog
- Remove components: Click the × button on a component
Component Palette
The component palette shows all available components, grouped by category:
- Built-in: Platform-provided components (Title, Rich Text, Image, etc.)
- Custom: Components uploaded by developers
Click or drag a component to add it to a content zone.
Component Properties
Each component has configurable properties defined by its dialog schema:
- Click a component in the editor
- The property dialog opens
- Fill in the required and optional fields
- Click Save to apply changes
Live Preview
The live preview pane shows a real-time rendering of your page as you edit. Changes appear immediately when you:
- Add or remove components
- Update component properties
- Reorder components
Page Hierarchy
Pages can be organized hierarchically using parent pages:
- Parent Page: Select another page to make this page a child
- Breadcrumbs: Child pages automatically generate breadcrumb navigation
- URL Structure: Child pages inherit the parent's slug (e.g., /blog/my-post)
Example hierarchy:
/ (Home)
├── /about
├── /blog
│ ├── /blog/post-1
│ └── /blog/post-2
└── /contact
Slug Management
The slug is the URL path for your page:
- Auto-generated: By default, slugs are generated from the page title
- Editable: You can customize the slug before or after creation
- Unique: Slugs must be unique within a site
- Valid characters: Lowercase letters, digits, hyphens, underscores, and forward slashes
Examples:
- Title: "About Us" → Slug: /about-us
- Title: "2024 Product Launch" → Slug: /2024-product-launch
Slug Best Practices
- Keep slugs short and descriptive
- Use hyphens to separate words
- Avoid special characters and spaces
- Consider SEO when choosing slugs
- Don't change slugs after publishing (breaks links)
Saving and Publishing
Pages have three states:
- Draft: Unpublished, work in progress
- Published: Live on the website
- Unpublished: Previously published, now taken offline
Saving Changes
Click Save to save your changes without publishing. This:
- Updates the page in the CMS
- Does not affect the published website
- Allows you to continue editing later
Publishing
See Publishing for details on publishing pages.
Page Settings
Click Settings in the page editor to configure:
- Title and Description: Update page metadata
- Template: Change the page template (resets content zones)
- Parent Page: Change or remove the parent page
- Tags: Add tags for categorization and filtering
- SEO Metadata: Configure Open Graph, Twitter Cards, and more (see SEO Settings)
Editing Existing Pages
To edit a page:
- Navigate to Sites → Select your site → Pages
- Click the page you want to edit
- Make your changes in the page editor
- Click Save
Unsaved Changes Warning
If you navigate away from the page editor with unsaved changes, you'll see a confirmation dialog. This prevents accidental loss of work.
Deleting Pages
To delete a page:
- Navigate to the page list
- Click the ⋮ menu next to the page
- Select Delete
- Confirm the deletion
Important:
- You cannot delete the last page of a site
- Deleting a parent page does not delete child pages (they become top-level pages)
- Deleting a published page removes it from the website
Page Best Practices
Content
- Write clear titles: Titles appear in navigation and search results
- Add descriptions: Descriptions improve SEO and social sharing
- Use appropriate templates: Choose templates that match your content type
- Organize with hierarchy: Use parent pages to create logical site structure
Components
- Start simple: Add components incrementally, don't overcrowd pages
- Test on mobile: Use the preview to check responsive behavior
- Consistent styling: Use design variables for consistent appearance
- Accessibility: Ensure all images have alt text and content is keyboard-navigable
URLs
- Plan your structure: Think about URL hierarchy before creating pages
- Avoid changing slugs: Changing slugs after publishing breaks external links
- Use redirects: If you must change a slug, set up redirects (contact your administrator)
Related Topics
- Managing Templates — Create and edit templates
- Publishing — Publish pages to your website
- SEO Settings — Optimize pages for search engines
- Component Structure — Learn about components